
Caravan Pre Departure Pack Down Checklist

Pre-Departure
As caravanners, (campers and tent-ers also) there are always certain things we need to be thinking of when we travel. It’s not a matter of the hassle being taken out of the equation once you’ve left your previous destination, but more a new set of checklists running around your head each time you leave a destination, arrive at a destination and while you’re travelling also.
With our checklist you have the freedom to:
*Personalise it to suit your lifestyle and needs
*Print out as often as you need
*Laminate the list
*Use a whiteboard marker to check off the jobs when completed
*Reuse over and over as many times as you like
*Add and delete items that will more suit your circumstances
*Tick off each task as you complete it
We have laminated our checklist, so that we can reuse it over and over, until it becomes a little tacky and needs replacing. If there is anything else we need to add to it, we can do this before we print it out again. We use a white board marker to tick the boxes or put a line through the item when the job is done, and that way when we arrive at the next destination, we just wipe off the marker and it’s ready to be used again. Simple things.
Once you've downloaded this checklist, you can make up your own using our jobs as a guide. Your set up will probably have a few different things that need to be done each time, so adjust accordingly to make your checklist specific to your needs.
You can save time going over those last minute jobs, and check off each one as you go. Knowing it's done, and when everything is ticked off, it's time to hit the road!

These are just a few items that you will find on our printable checklist.
Most of these are in no particular order, but we’ve catergorised them into interior and exterior.
Interior
Fridge – There are a couple things that need to be looked at here. Most caravan fridges are well set up. Some even have a small rail on each shelf to assist in preventing items falling off while travelling. You could look at shuffling items around before you travel to further prevent movement whilst on the road. Always make sure that any lids on items are secured, eggs are either in cartons or in a special travel egg carrier and that drinks in non-sealable cartons don’t have a chance to fall over and spill.

If your car and caravan have the wiring set up with an Anderson plug or through the trailer light plug, you can have the fridge setting on 12v to assist in keeping the fridge contents cold while on the road. It’s a handy set up, especially if you move a lot.
Stove – it always pays to ensure the oven, grill and stove are all switched off all the time when not in use, and before travel check the same. Turn all the switches and knobs to the ‘off’ position. Make sure the glass lid (if your vehicle has one) is put down and secured in the travel position. Most will have a magnet that keeps the lid and the stove top connected, for safety while travelling. Make sure the oven door is shut and secured, and any contents in the oven should be removed. We keep the standard small tray and rack in one of our cupboards, as we don’t want it banging around in the oven and against the door while we are driving.

Microwave – when most caravans’ microwaves are installed, they are connected with a couple of brackets, to ensure the microwave doesn’t move while travelling. Some caravans don’t have a built-in microwave and therefore the owners carry one and sit it on the bench while stopped. We used to do this with our convection oven when we had a caravan without a built-in oven.
More about the kitchen in our printable checklist
Ensuite – if you have an on-board bathroom, you’ll need to secure a couple of doors here. Start with the shower door. Most are a durable glass but can still wind up damaged if not secured properly before you set off. A lot will have a magnetic strip on the door itself, and the frame of the door so when the door is closed, the magnets hold it in place. Ours has an extra safety clip for transit also. You will more than likely have a door to your ensuite. Whether it be a sliding door, or concertina door, they will all have their own way of securing. Our slide out van had a sliding door, which had a bolt style lock at the top of the door and at the bottom of the door. The #JaycoStarCraft we use now has a concertina door which latches open with a strap, ready for travel.

More about the table in our printable checklist

TV – In many caravans, there are a couple of TV brackets where the TV can be sat in. For example, our slide out caravan had one at the end of the bed and one in the kitchen above the bench. We find it is ok for the TV to sit in one of these when we are driving, however, we always ensure the safety lock is in place and bolted in and we also have a strap to extra assist in keeping it in place. This way the TV can’t move and we have never had a problem with movement. Some travellers prefer to lay the TV on their bed pushed up towards the head of the bed under a few pillows. Either way is fine, it will just take a few trips to see what works best for you.

More about the windows in our printable checklist

Roof hatches – Again, roof hatches are a great idea for light and ventilation, but these must always be checked for secure positioning before travelling. I have only just figured out how they work on our last trip. Mr has always secured these as they are a little out of my reach. Each of the hatches has 2 slides. One is a mesh for when the hatch is open and you don’t want leaves or anything coming into the van, much like a fly screen idea, and the other is a night shade which blocks out most of the light. We leave both of our slides in the open position when we travel.

Electric items – It’s always super important to turn off electric items when not in use, and this goes the same for your caravan. And, especially when you are travelling. Now if you have been plugged in to mains power this mostly won’t apply, however if you have been off grid / free camping, then this is something you need to be aware of. You may have a switch in your van that turns on your batteries to use the power when not plugged in, and this switch should turn everything off in one hit. Most people would turn this off when they travel, however if you don’t then it is advised that you make sure all of your electrics are turned off before setting sail.
Check out the bathroom items in our printable checklist
Exterior
BBQ – We have a Weber style BBQ called a Ziegler and Brown, which we call Ziggy. It’s pretty much all we use for cooking outside, as it does all types of cooking. This is one of the reasons why we made this purchase as it takes away the need for a bulky flat style BBQ that would have to sit on the floor in the van or the ute while we travel. Mr has fitted our Ziggy into our tunnel boot on a slide that he designed, built and installed himself.
More about how we lock our Ziggy in the checklist

Hoses and cords – One of the first things you would probably do is to disconnect mains water and power from the place you are connected to. We always check that no more jobs inside the van need power and water first, as a couple of times while we were still learning, we had to plug back in for something.
See what we do with storing our hoses in the checklist
Awning – one of the many particularly important jobs to do before you travel is to secure your awning for your next journey. If this isn’t done correctly, you could be up for some expensive fixes. See more important info on awnings in our checklist.

Outdoor items can be found on the checklist also
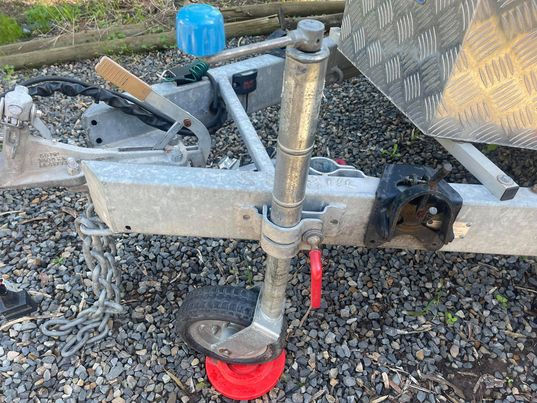
Stability legs – your van will have stability legs which should be used any time you are unhitching. Once you have done most jobs inside the van, it would be safe to wind them up. It should be done before you wind up or down the jockey wheel as unlevelling will most likely cause damage. Check out more important inofrmation on our checklist

Doorstep – you may just find one trip that you left your door step out. The vast majority of campers we have spoken have actually done this at least once. We haven’t, yet, let’s hope we don’t either. Be sure before you get in the car, to check that the step is slid in and sitting in travel position. The last thing you want to do is damage it on a kerb or the like.

Picnic table – If you have a picnic table on the side of your van, you’ll need to ensure regularly that this is shut and locked. It’s quite easy to walk past it while packing up and it looking locked, however not actually been locked with a key, just pushed up. Be sure to lock both locks for secure travelling.
Don't forget the gas bottles also on the printable checklist


Antenna – Many caravans have the boosted antenna system with the wind-up antenna on the roof for better TV signal. If your caravan has this, you will want to add this to your checklist. We have seen and heard so many stories of these being left up (by accident of course) while travelling and causing a lot of damage, which is also quite costly.
Mirrors and hitching up, important items on the checklist

Wheel chocks / levelling ramps – I’m sure if you have been caravanning a few times, one of those wheel chocks has been flattened a little. I for one have left them under the wheels a few times, so I almost have shares in the wheel chock industry! Levelling ramps not so much as they tend to stand out a little more. But always be sure to pack them away safely in their dedicated spot for travelling, otherwise you’ll be just like me, replacing them over and over.
So many things to consider on the drawbar, we have included in the printable checklist!

Electric brakes, ESC and Handbrake items on the checklist

Breakaway system – a caravans’ breakaway system is a great invention, designed to engage the caravan’s handbrake if for some reason the caravan breaks away from the tow vehicle. So instead of the caravan keeping momentum and continuing down the highway, it will stop it in its tracks minimising accidents.

Light check – again an important one here. Even though you arrived at your destination with all lights working in good order, doesn’t always mean they are going to work next time you hitch up. It only takes a slightly broken wire for your lights to not work correctly. So each and every time you move, check that all indicators / hazards are working, plus your brake lights and tail lights. If you have reverse lights, now is a great time to test them also.
Here you can grab yourself our checklist to use on your next adventure!

Do one final walk around to ensure doors and windows are shut and locked, all hoses and cords are disconnected, awning is secure, hatches are in travel position, gas bottles off, step in travel position, picnic table folded away and locked, and wheel chocks and levelling ramps removed.
When you finally head off, be sure to take plenty of rest stops. Don’t be afraid to need to pull over and stretch your legs or grab a snack. It is advised to stop every 2 hours and move about a little before fatigue begins to set in. When you do stop, always do a quick walk around, checking the windows and doors are all shut and locked, the caravan is all still connected safely, and nothing has come loose.
Our checklist has become invaluable to us. When everything is ticked off, we know we are good to go on our next adventure!
**Note: It’s always a good idea to check that your caravan is still secured to the car each time you stop. Things can wriggle loose and, although uncommon, people and little ones may play with your connections and safety items. So checking these things will give you peace of mind for the next leg of your journey.
Happy and safe travels xx


Join us on your socials!


2025 Big Lap on a Budget
Comments